Services / Dent & Collision Repair

Dent Repair

Dents aren't just cosmetic. A hard dent can stretch metal, distort body lines, and create tension that causes future cracking or edge lifting if the repair is rushed. The cheap approach is "pull and fill." The correct approach is restoring shape with controlled metalwork so the repair stays stable and the panel looks right under reflection.

Goal
Stop the chaos
Output
Clear scope
Focus
Correct repair
Finish
Match + blend
Dented classic fender, collision damage, frame measurement, repair in-progress
!
Classic cars aren't "normal claims."
Parts, materials, and finish matching change the repair plan, and the estimate has to reflect that.

Our Dent Repair Approach

We assess dent depth, creasing, edge proximity, and whether the impact affected mounts or adjacent panels. Then we choose the right method: careful pulling, shaping, and metal finishing. Filler, if used, is kept thin and sealed properly, because heavy filler is where shrink lines and future problems come from.

Dent repair also has a matching problem: texture and sheen. Even if the panel is straight, a sloppy blend or mismatched gloss gives the repair away immediately in sunlight. We plan the repair so the finish disappears.

If the goal is "you can't find it," the steps matter more than the tools.

Before and after close-ups of a dented fender with a straight reflection line post-repair

Dent & Collision Repair Services

We fix damage from accidents and collisions with the same rule as restoration: fix the foundation first, then match the finish. No "close enough" shortcuts that show up later.

01

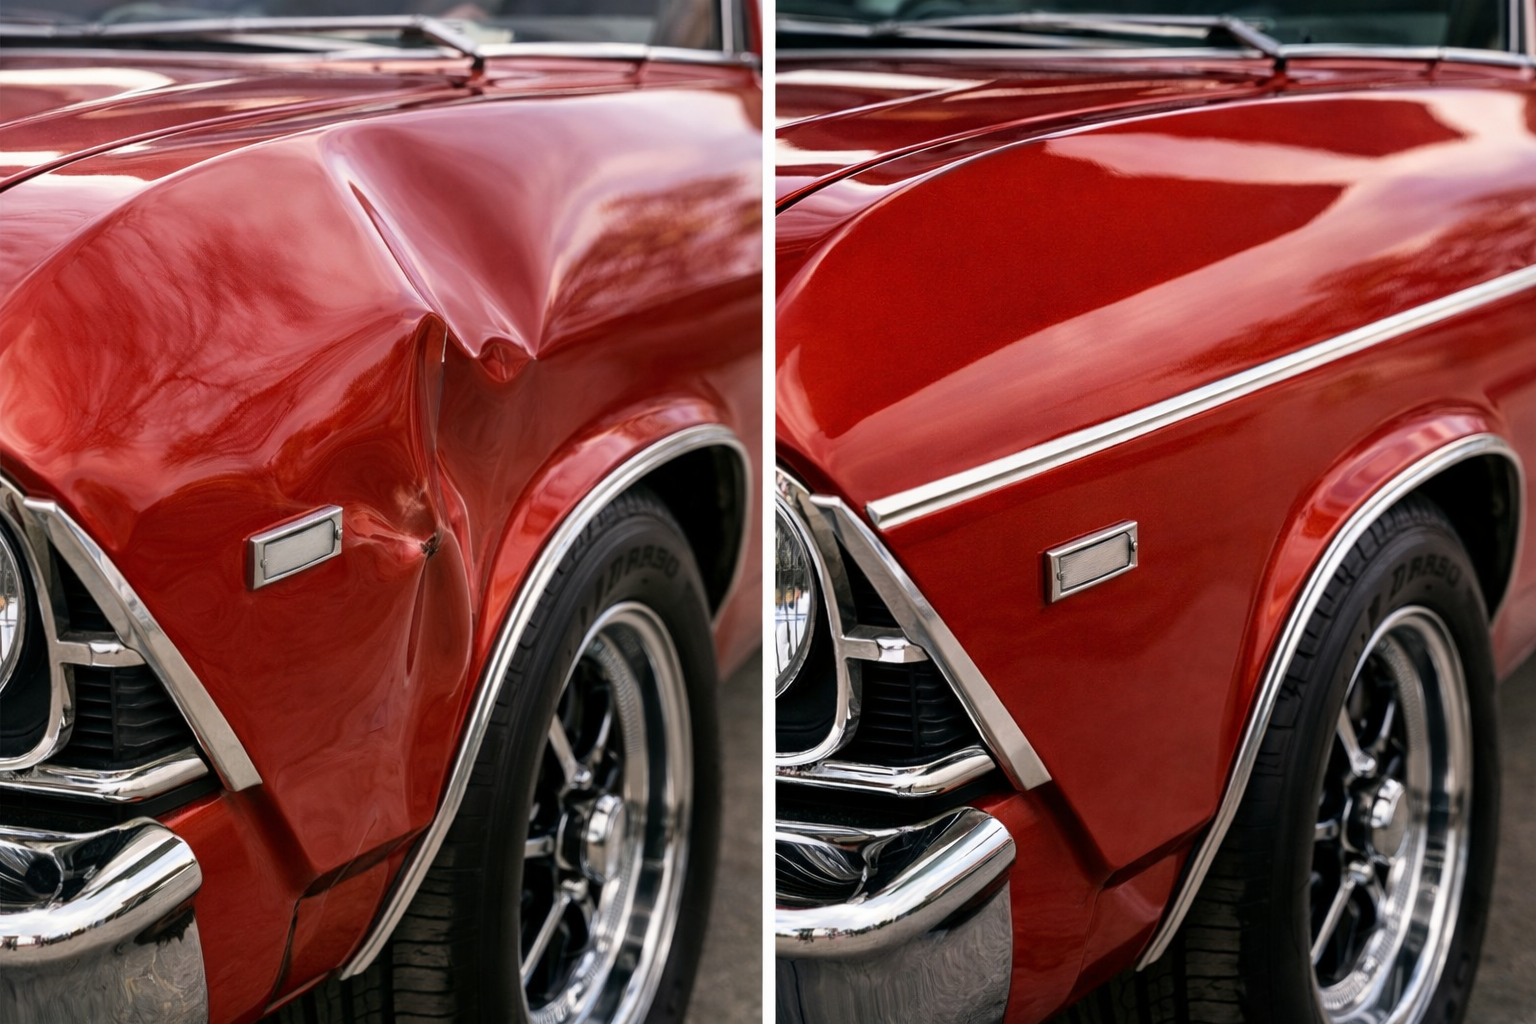
Collision Damage Assessment (What's Visible vs What's Real)

Collision damage lies. A dented fender can hide bent brackets, shifted gaps, torn mounting points, and underlying metal fatigue. We inspect the impact path, mounting structure, panel alignment, and prior repair work to scope the real job.

  • Panel fitment + gap checks (doors/hood/fenders)
  • Mount points, brackets, and hidden distortion inspection
02

Dent Repair & Metal Finishing (Not Just "Pull and Fill")

The best dent repair is the one that doesn't rely on inches of filler. We use controlled pulling, shaping, and metal finishing to restore the panel's true contour and keep the repair stable for the long term.

  • Controlled pulls + contour restoration for clean reflections
  • Minimize filler dependency (because filler shrink is real)
03

Alignment, Fitment & Hidden Structural Corrections

If the gaps are off, the car looks wrong from ten feet away, even with perfect paint. We correct alignment and fitment before refinishing so panels sit right and hardware mounts correctly.

  • Door/hood/fender alignment and latch function checks
  • Mounting points repaired so parts fit without forcing
04

Refinishing & Color Match (So the Repair Disappears)

The paint is the final layer, not the fix. We build a stable finish system (seal, prime, block, spray, cure, correct), then match color and sheen so the repair doesn't "broadcast" itself in sunlight.

  • Epoxy seal + high-build + blocking for true straightness
  • Blend strategy + correct gloss so adjacent panels match

Avoid the Hassle: Get a Reasonable Estimate Fast

You're not trying to become an insurance expert. You just need to know what the repair actually involves and what it's likely to cost. We focus on fast clarity: scope, options, and realistic numbers.

What we need for a fast estimate
  • Photos: wide shots + close-ups + angles (include gaps and edges)
  • Impact details: where it hit, what it hit, any drivable issues
  • Vehicle info: year/make/model + prior restoration history (if known)
  • Insurance status: claim started? adjuster info? or paying out-of-pocket?

What you get back

A clear repair plan and a range you can actually use, so you can decide quickly what's worth doing and what isn't.

Estimate
Reasonable range
No fantasy numbers.
Options
Repair paths
Driver vs show-level.
Timeline
Realistic
Based on scope.

When Lawyers Are Needed (and When They Aren't)

Most claims should be simple. But classic cars can turn "simple" into a fight, especially when the other side tries to treat your car like a commodity. If things start getting weird, you need to recognize it early.

Signs you may need legal help
  • Liability is disputed or shifting
  • Lowball valuation or "total loss" pressure
  • They ignore restoration history and parts reality
  • Delays, stonewalling, or constant re-requests
When it's usually straightforward
  • Clear fault + cooperative adjuster
  • Minor damage with simple parts sourcing
  • Agreed scope and documented repair plan
  • Payment flow is clear and timely
What we can do (without the drama)

We document damage, provide clear repair rationale, and support estimate clarity so you can make informed decisions quickly. If it escalates beyond repair logistics into disputes, that's when legal counsel may be appropriate.

Collision Repair Process (Including Refinishing)

Paint is the last step. The repair is everything underneath it. Here's the actual sequence.

  1. 1
    Damage Inspection + Documentation

    Photos, gap checks, impact-path assessment, and identification of hidden damage. Document now so it's not "discovered" later.

  2. 2
    Repair Plan + Estimate

    Define what gets repaired vs replaced, parts strategy, finish strategy (blend vs panel), and realistic timeline.

  3. 3
    Disassembly + Access

    Remove trim, lighting, bumpers, and adjacent parts as needed to access the true damage and avoid masking problems.

  4. 4
    Metalwork + Alignment

    Restore structure, mount points, and panel geometry. Test-fit and correct gaps before surface build begins.

  5. 5
    Surface Prep + Substrate Control

    Strip to the correct level, clean contamination, address corrosion, and prep for adhesion. This prevents later lifting and bubbling.

  6. 6
    Epoxy Seal + Build Primer System

    Epoxy primer to seal and stabilize, followed by high-build systems as needed for straightness and uniform surface.

  7. 7
    Guide Coat + Block Sanding

    Blocking stages to bring the panel back to true. Reflection checks ensure the repair disappears in sunlight.

  8. 8
    Color Match + Blend Strategy

    Match color and sheen against adjacent panels. Choose blend boundaries that make the repair invisible, not "almost invisible."

  9. 9
    Spray, Cure, Cut & Polish

    Controlled spray and cure schedule, then correction (cut and polish) for uniform reflections and finish consistency.

  10. 10
    Reassembly + Final QA

    Fitment checks, gaps, hardware, trim alignment, and finish inspection. The car leaves tight, clean, and correct.